


“I really don’t know why it is that all of us are so committed to the sea, except I think it’s because in addition to the fact that the sea changes, and the light changes, and ships change, it’s because we all came from the sea. And it is an interesting biological fact that all of us have in our veins the exact same percentage of salt in our blood that exists in the ocean, and, therefore, we have salt in our blood, in our sweat, in our tears. We are tied to the ocean. And when we go back to the sea – whether it is to sail or to watch it – we are going back from whence we came.
― John F. Kennedy
Like a lot of people, I compulsively collect seashells (and interesting rocks) whenever I go to the beach. Because this habit is so common though, I’m often disappointed with the number of collectible artifacts I’m able to collect. While visiting Great Island at the end of the summer I was really excited to find that this particular beach was in fact full of beautiful intact shells.

This one was too small for this projects but still one of my favorites
The thing about collecting seashells and rocks is that even though I feel compelled to do it, I’m never quite sure what to do with them afterward. I had seen a few tutorials around the internet lately where people had painted shells with gold leaf or gold spray paint and then repurposed them as vessels for jewelry or salt. Being that I’m already a big fan of gold leaf I thought I would give this a try.
It turns out there were A LOT of tutorials for painting seashells. In the end, I ultimately combined a couple ideas from a few different resources. At one point I came across this tutorial by the godmother of DIY, Martha Stewart. I really liked the idea of using the painted shells as candles so that’s what I decided to do (and realistically, I was never going to convince Jared that spooning salt out of a shell was a practical alternative to our salt shaker).
I decided I would paint the shells using gold leaf paint rather than spray paint – primarily because I don’t have any outdoor space and indoor spray painting is not great for your health. I bought this gold leaf paint on Amazon and used a small paintbrush I already owned to start.
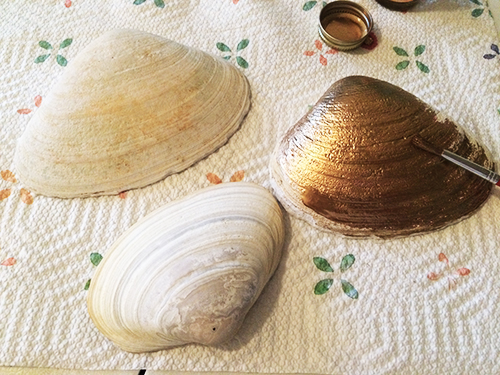
First I scrubbed the seashells to remove any remaining sand or dirt and then left them to dry overnight. The next day I got to gold leafing. The paint went on pretty easily and only required a single coat to cover the shells surface and leave them looking super metallic. I noticed that at times the paint would become too settled in the container and I’d start to see a pink-ish tint to it as I was painting. Whenever this happened I’d just stir up the gold leaf a bit and repaint the area that had been effected. I painted the tops first and then the bottoms once they were dry enough to be flipped over. The gold leaf paint only took about 30 minutes to dry completely so this was pretty quick. After the paint had dried on both sides I sprayed the seashells with some clear shellac. I’m not sure that this was even necessary but but I wanted to make sure the gold paint wouldn’t come up when I eventually poured the wax into the shells.

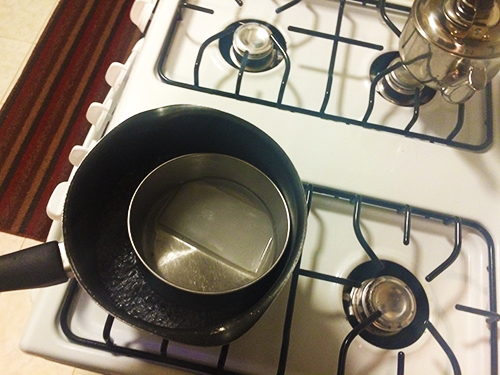
Now that the shells were looking really glam it was time to get to the wax. I’ve never made candles before so I followed Martha’s instructions more closely here. I had bought some household paraffin wax and a spool of braided wick from Amazon. Melting the wax was surprisingly simple. I took one of the blocks of wax, placed it inside of a metal bowl and then placed the bowl inside of a pot of water and boiled the water over the stove. The wax melted into liquid in just a few minutes.
While the wax melted I cut a few pieces of braided wick and took out a few sets of chopsticks so that I could hold them in the shells while the wax hardened. Martha’s tutorial recommends using candlewicks that already have metal tabs attached to them, which eliminates the need for chopsticks. This would have saved a little effort but you get a lot more wick for your money if you just buy a spool of it.

Next I poured the wax into the candles and set the chopsticks to hold the pre-cut candlewick.

And voila! It’s that easy. Honestly the most challenging aspect of this whole project was trying to clean the excess wax out of the metal bowl. For the most part though this was remarkably simple. Had I put more forethought into the candle process I would have liked to add some other ingredients to the wax to give it color and fragrance. It’s something I definitely want to try again, especially since I have a lot of leftover wax and candlewick.

These really aren’t the most practical candles in terms of actually providing light. There’s such a small amount of wax in each one that they really can’t burn for more than a few minutes. However, I think they make for really charming decorative accents. I really like the idea of using them as décor on a tablescape for a dinner party. Because I don’t have that kind of space (or table) for entertaining I’ve placed mine on my windowsill and end tables in my living room.

I think they look pretty cute 🙂


One thought on “metallic seashell candleholders.”